


Build Your Own Microphone Pop Screen
Posted by Michelle Lasure on Jun 19, 2009 in Tutorials | 0 comments

One of the bigger hassles in editing voice audio tracks is cleaning up loud pops in the recording where plosive ‘p’ and ‘b’ sounds cause a burst of volume. These are easily avoided by placing a screen between the person speaking or singing and the microphone. By creating a fixed distance between the vocalist and the microphone you get the added bonus of reducing sibilant sounds made through speaking words with ‘s’ and ‘ch’. Buying a pop screen from a music supply store will set you back $20-30, depending on the quality of the screen and the stand on which it’s mounted. It’s easy to build your own screen with some nylons and an embroidery hoop available at most craft stores for a couple of dollars.
Sibilance and plosives
Sibilance and plosive sounds do more damage to a vocal track than almost anything other than turning up the gain to the point of distortion. If you listen carefully to almost any recording you do both types of disruptive vocal tonalities are quite easy to pick out.
Sibilance is that lisping ‘s’ sound you hear from words that start or end with the official letter of Superman and shrill sounds generated from the ‘ch’ combination so popular with cats who adore curled cheese snacks. You can sometimes de-ess a recording in software after it’s finished by using multiband EQ to eliminate the offending frequencies or by running your entire recording through a de-essing plug-in. The best way to prevent overloading a recording with sibilant sounds is to talk into the microphone at a slight angle so the ‘s’ sounds don’t hit the microphone directly. Staying slightly off the microphone in the six-inch range also helps because the air between the microphone and your mouth gives the ‘s’ sibilant sounds a chance to dissipate.
Plosive sounds are the percussive vocal blasts created when speaking words with hard ‘p’ and ‘b’ sounds. The sounds create a volume spike which skews your recording and may distort audio with a loud pop where the sound appeared. Those bursts of vocal impact can be held in check quite easily by putting a pop screen (sometimes called a pop blocker) in front of the microphone. A pop screen is basically a thin nylon or metal mesh stretched on a frame.
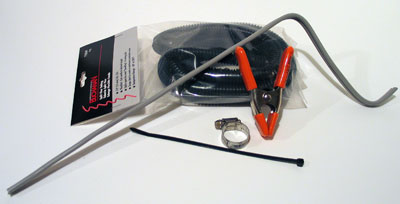
You can build your own pop screen and stand with more durability and all the pop elimination you need to sound like a pro. To make a pop screen and stand you need the following items:
| 6″ Embroidery Hoop | $1.46 |
| Generic Pantyhose | $1.50 |
| 1/2-inch Split Flex Tubing | $1.12 |
| 2 feet 10-2 Wire | $1.50 |
| 7.5″ Black zip ties | $1.74 |
| 1 1/4″ Compression fitting (from plumbing) | $0.25 |
| Optional 1″ Spring Clamp | $2.09 |
| Total Cost | $9.66 ($7.57) |
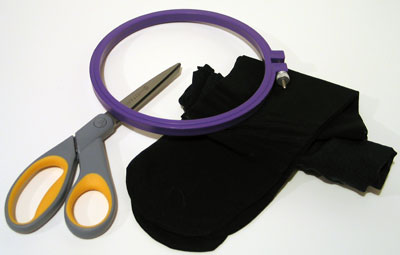
When you make the screen the first thing you need to do is cut off the top part of the pantyhose at thigh level, which leaves you with two separate leg pieces. Take one leg and cut a line from the thigh down to the toe. At the toe, cut the toe end straight across leaving you with a long rectangular sheet.
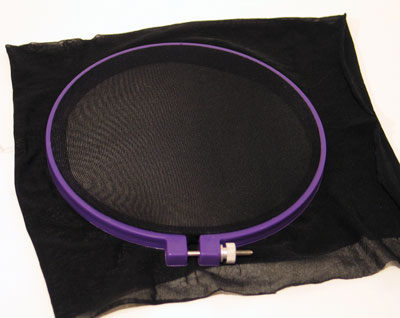
After separating the embroidery hoop into two pieces, fold the pantyhose in half and stretch it across the inside hoop. Keeping the nylon hose as tight as possible, place the outside portion of the embroidery hoop on top of it and tighten the compression fitting so the two hoops hold the nylon snugly in place. You’ll be left with a square edge all the way around the hoop.
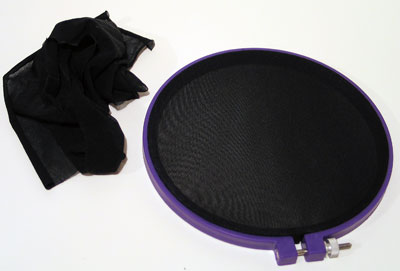
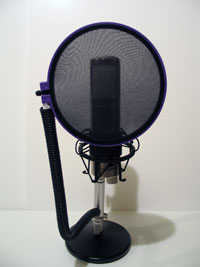
Trim the leftover nylon so that no excess scrap is sticking out from the embroidery hoop. At this point, you have a finished screen capable of blocking pops with ease. Of course, you’re limited to holding the screen in front of the microphone throughout the record process, which may become tiresome.
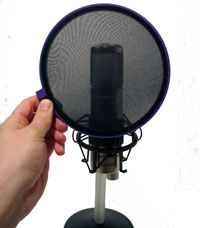
The 10-guage electrical wiring provides the stability and flexibility required to support the weight of the screen while allowing you to bend it to adjust as needed. Split flex tubing hides the wiring providing a more polished look to the stand arm. A compression fitting meant to connect water piping holds the stand in place at the base and a zip tie secures the screen to the end of the stand.
Bend the 10-guage wire into a shape meant to fit in front of the microphone. Cover the wire with the flex tubing up to the point where the wire gets fastened to the microphone stand.

Secure the wire to the microphone stand with the compression fitting. Zip ties work here to but if you need to make adjustments you need to cut them and start over. With the fitting, just unscrew, adjust and tighten. Find the point where the screen will connect to the top of the wire and trim the flex tubing leaving any remaining wire exposed.
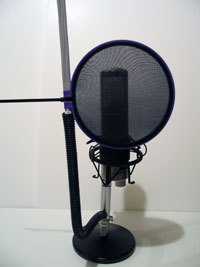
After marking the position on the wire covered by the screen, trim the wire to fit. After trimming the wire, fasten the pop screen to the wire by running a zip tie around the wire and the metal screw of the compression fitting on the embroidery hoop. You now have a finished pop screen for under $10.
Excerpt taken from Jake Ludington’s MediaBlab.
